Multi Instance Exercise 9
Exercise 9: Named Instances
Objective
To utilize Named Instances to have 2 schedules built with different command lines.
Summary
Create a multi-instance schedule, My First Named Instance, with three machines in it. Create a Windows job called Machine Groups that will build an instance of the job to run on each machine in the group.
Instructions
Define a New Machine
- Open the Agents screen from the Library.
- Click the Add button.
- In the Name field, enter
SMAAdvancedTraining. - In the Machine Type dropdown, select
Windows. - Click Save
- In the General Settings section:
- Enter the
IP Addressyou are using to Remote Desktop to this training server. - Change the Socket Number to
4100.
- Enter the
- In the Communication Settings section.
- Change the JORS Port Number to
4110
- Change the JORS Port Number to
- Click the Save button.
- Close Operations.
Create the Schedule
- Create a new Schedule called MY FIRST NAMED INSTANCE.
- Check the Multi-Instance checkbox
- Click the Save button.
- Enter Admin Mode
Create the Named Instances
- Expand the Instance Definition tab.
- Click the Named Instance radio button.
- Click the small green + button.
- Enter Advanced Training as the new Instance Name.
- Click the check mark to save the instance name.
- Repeat the last 3 steps to create a Basic Training Instance.
Define the Schedule Instance Properties
- In the Selected Named Instance dropdown, select Advanced Training
- Click the large green + to add a Property.
- In the Name field, enter DURATION
- In the Value field, enter
15 - Click the check mark to save.
- Click the large green + to add a Property.
- In the Name field, enter PATH
- In the Value field, enter
C:\Program Files\OpConxps\MSLSAM\1 - Click the check mark to save.
- In the Selected Named Instance dropdown, select Basic Training
- Click the large green + to add a Property.
- In the Name field, enter DURATION
- In the Value field, enter
10 - Click the check mark to save.
- Click the large green + to add a Property.
- In the Name field, enter PATH
- In the Value field, enter
C:\Program Files\OpConxps\MSLSAM - Click the check mark to save.
Define the Exceptions
- Select the Advanced Training Instance.
- Select the Exceptions tab.
- Click the (+) to the right of the the Job Pattern dropdown.
- In the Job Pattern field, enter
* - Click the check mark to save.
- Under Job Exceptions
- Click the + button
- In the Job Exception dropdown, select Primary Machine
- In the To Replace field, enter
SMATraining. - In the Replace With field, enter
SMAAdvancedTraining. - Click the Check mark to save.
- Click the (+) to the right of the the Job Pattern dropdown.
- In the Job Pattern field, enter
Upload* - Click the check mark to save.
- Under Job Exceptions,
- Click the + button
- In the Job Exception dropdown, select Job Build Status
- In the Replace With dropdown, select To Be Skipped.
- Click the Check mark to save.
- Click Save
Create the Jobs
- Create 4 Windows Jobs using the
Genericp.exe
- Job Names and Run Order:
- Run Report
- Transfer Report to Network
- Upload Report to Vendor
- Archive Report
- Select SMATraining as the Primary Machine.
- Command Line for all 4 Jobs:
"[[SI.PATH]]\genericp.exe" -t [[SI.DURATION]]
Build the Schedule
- Build the Schedule.
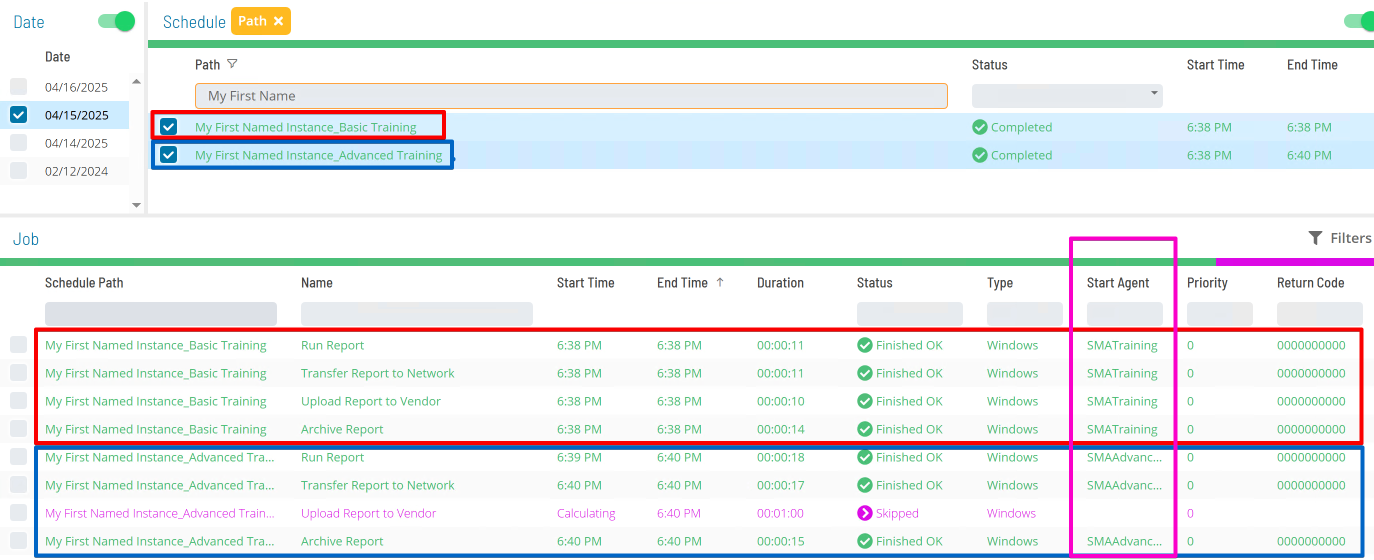
- Verify that both Instances are built.
note
- Verify that the Advanced Training Instance is running on the SMAAdvancedTraining Machine while the Basic Instance is running on the SMATraining Machine.
- Verify that the Upload Job in the Advanced Training Instance was set to be Skipped.
 )
)
Enterprise Manager
Details
- Open the Machines screen from the Administration section of the Navigation Panel.
- Click the Add button.
- Enter SMAAdvancedTraining in the Name text box.
- Select
Windowsas the Machine Type. - Change the Socket Number to
4100. - Enter the
IP Addressyou are using to Remote Desktop to this training server. - Click the Save button.
- Click the OpCon Advanced Settings Panel link.
- Click the Communication Settings tab.
- Select JORS Port Number in the table.
- Enter a value of
4110. - Click the Update button.
- Click the Save button
- Create a new Schedule called MY FIRST NAMED INSTANCE.
- Mark the Multi-Instance checkbox in the Schedule Properties frame.
- Click the Instance Definition tab.
- Click the Named Instance radio button.
- Click the Add button in the Instances field on the left side of the screen.
- Click the Add button on the Select Instance popup window.
- Enter Advanced Training in the Instance Name.
- Click the OK button.
- Click the OK button.
- Repeat this creating a Basic Training Instance.
- Select the Advanced Training Instance in the Instance box on the left side of the screen.
- Create a Property for DURATION.
- Enter DURATION in the Property Name text box under Instance Details.
- Enter
15in the Property Value text box. - Click the Add button to the right of Property Value.
- Create a Property for PATH.
- Enter PATH in the Property Name text box under Instance Details.
- Enter
C:\Program Files\OpConxps\MSLSAM\1in the Property Value text box. - Click the Add button to the right of Property Value.
- Click the Save button.
- Do the same for the Basic Class Instance with two differences
- Use
10instead of15for DURATION. - Remove the
“\1”at the end of the PATH.
- Use
- Click the Save button.
- Select the Advanced Training Instance.
- Click the Add button under Exception Rules.
- Enter the Job Pattern as
*. - Replace Primary Machine
SMATraining. In the New Value text box enterSMAAdvancedTraining. - Click the OK button.
- Enter the Job Pattern
Upload* - Click the Add button under Exception Rules.
- Select Job Build Status from the Job Field drop-down.
- Select
To Be Skippedfrom the New Value field. - Click the OK button.
- Click the Save button.
- Open the Job Master with MY FIRST NAMED INSTANCE selected.
- Create four Windows Jobs using the
Genericp.exe.- Job Names and Run Order:
- Run Report
- Transfer Report to Network
- Upload Report to Vendor
- Archive Report
- Select SMATraining as the Primary Machine.
- Command Line for all three Jobs:
"[[SI.PATH]]\genericp.exe" –t [[SI.DURATION]]
- Job Names and Run Order:
- Build the Schedule(s).
- Verify that both Instances are built.
- Verify that the Advanced Training Instance is running on the SMAAdvancedTraining Machine while the Basic Instance is running on the SMATraining Machine.
- Verify that the Upload Job was set to be Skipped.